|
|
|
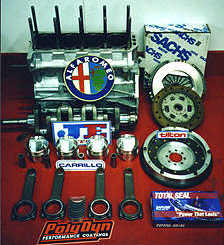
CARRILLO ROD INSTRUCTIONS The Carrillo connecting rod is a precision, high strength, quality connecting rod, which when properly installed and maintained, will perform flawlessly in today's racing engines. • Read the instructions furnished with the rods.
|
|
CARRILLO RODS THE ULTIMATE STRENGTH OF MATERIALS AND
PROCESS The design is widely copied but no manufacturer can duplicate the material or process that makes Carrillo rods the strongest and best in the industry. Fred Carrillo approached the challenges of manufacturing with the idea of no compromise. MATERIAL. The perfect rod needed the ultimate material. To accomplish this Fred invented and patented his own special steel alloy. Like Coca Cola, this formula is still a secret. This proprietary chrome/nicke./vanadium steel alloy is denoted specifically as Carrilloloy in industrial lists. PROCESS. Equally important, the heat treating process is likewise proprietary. Unlike some other manufacturers, this process is strictly controlled with no shortcuts in the length of time it takes to establish ultimate strength. QUALITY. To manufacture the best, unequaled connecting rod in the industry, there would have to be uncompromising quality control. This philosophy is as evident today as it was at Carrillo's conception in 1963. Fred Carrillo, the founder of Carrillo Industries, has been deeply involved in Motorsports for most of his adult life. Although he was a noted aerospace engineer, his true passion was the mechanics of Motorsports. He is retired now but the company is in good hands and remains dedicated to the product to this day.
|
|
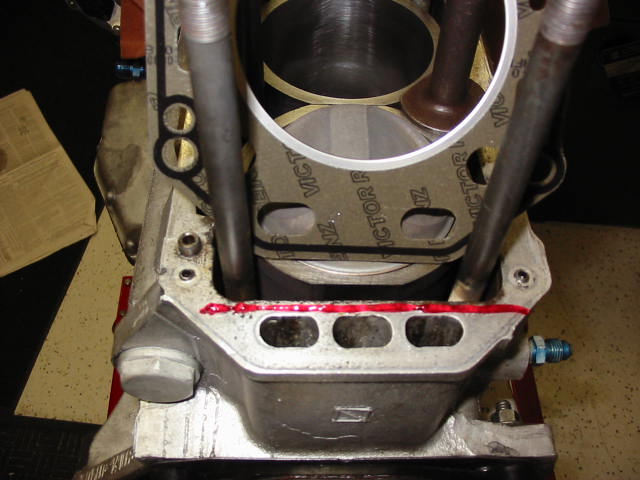
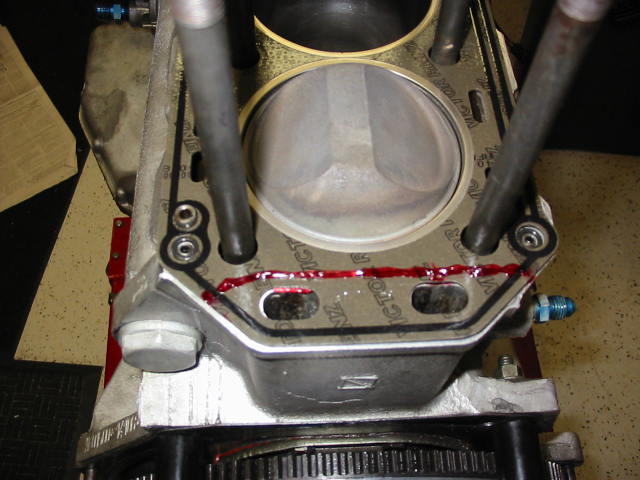
HEAD GASKET SEALING AND TORQUE WARNING!!!! Late model 2.0 head gaskets need special attention when being installed on early engine blocks. The early heads drained oil at both front and rear of the cam drain oil galleries. These passages run the length of the head under the spring pockets and were open both front and rear to drain back to the sump. The rear of these passages connected to galleries in the back of the block that drained vertically and exited on each side of the rear main bearing cap. Late model heads and blocks do not have this rear oil drain feature. Therefore, as shown in these photos (click for full size), the late model head gasket does not have the bead of sealer between the water jacket and the oil gallery. With each head gasket, we supply a tube of anaerobic gasket sealer to bridge this gap (top *AND* bottom of gasket).
If you are using an early block, the late model head gasket can leak water into the rear oil drain galleries and damage an engine with the resulting emulsion of water and oil. Fortunately most leaks occur during the warm up and retorque before subjected to any track time. High radiator pressure and coolant temperature exacerbate this problem during the break in period when the head gasket is seating. Most of the time the late model head gasket seals this gap and there is no problem. SUGGESTION: Remove the radiator cap for startup and warm ups prior to the hot torques. Before realizing there was no sealing bead printed on the late model head gasket, there were a number of bad experiences. In addition to the rear oil gallery receiving water, we occasionally had beads of water leaking out on the exhaust side of the head gasket. We learned to leave the radiator cap off while warming the engine up and to relieve pressure during the retorque phase of engine break in on the dyno. With no built up pressure there were no more leaks. HISTORY: Excessive torque spec in late model shop manual. As an Alfa dealer we had warranty problems with water and oil leaking out the head gaskets. At one point both water and oil leaked down sides of the block on new cars. Alfa's first attempt at a cure was to increase the torque on the head from 60.7-61.4 ft to 63-65 hot. We replaced hundreds of factory gaskets under warranty, using viton orings for the oil problem and copper coat sealer for the water leaks. We continued using the old torque specs and found that 56 cold and 60 hot was sufficient for both street and race. Any torque on the head bolts tends to distort the liners somewhat, so exceeding 60 pounds is inviting problems. We verified this using a torque plate and measuring with a dial bore gage. |
|
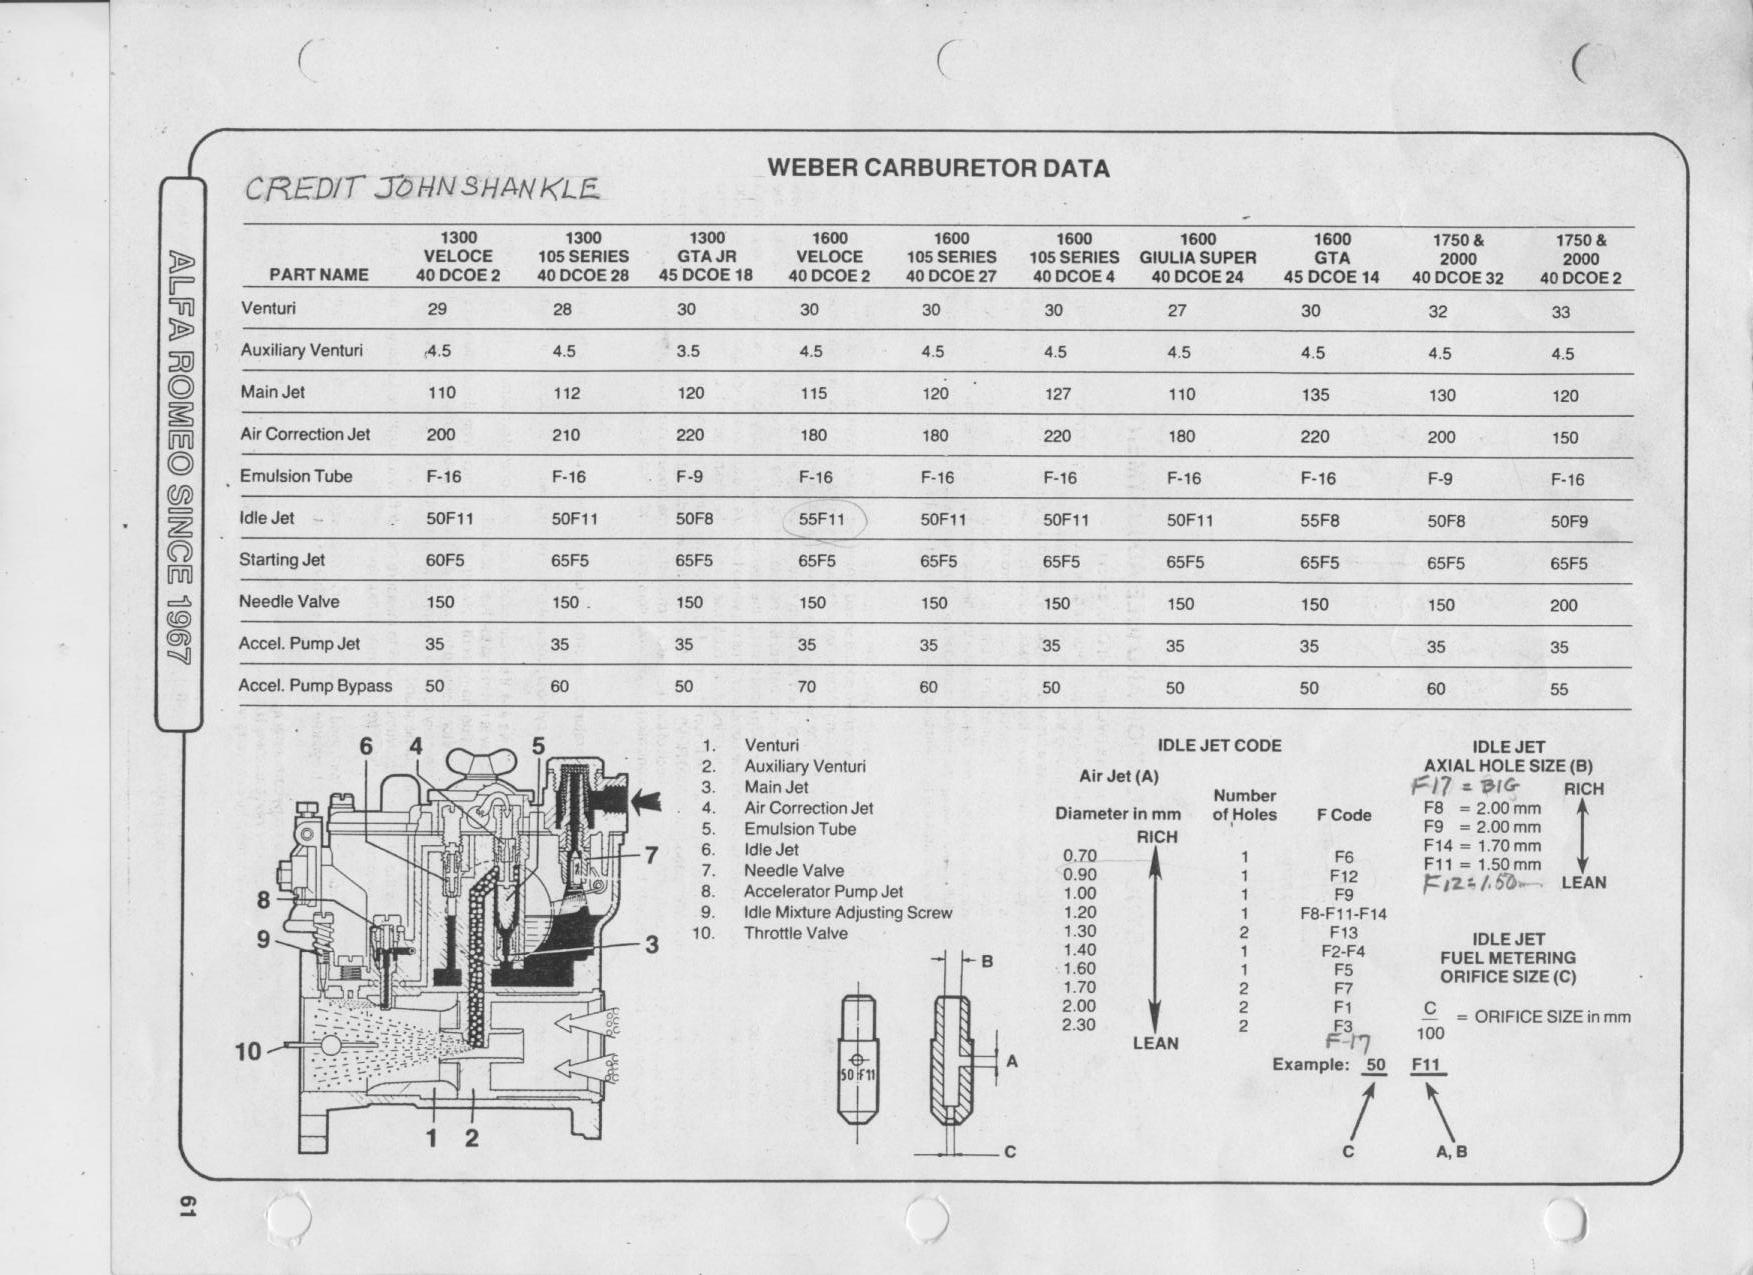
Install a fresh engine ... first track day. JETTING. I suggest that you get an air density meter and track thermometer. I have attached the original instruction sheet that charts the main jet size relative to these two parameters. If you do not know a local instrument company, you can order one ( in a nice wooden case) from Kinsler Fuel Injection, Troy , Michigan, 248 362 1145. In the absence of a density meter this first weekend, you should be ok relying on the temperature. I forgot to inquire if you have spare jets? FRESH ENGINE, CYLINDER HEAD TORQUE & SEATING NEW RINGS. 1st
Session. After warming it up in the paddock, take it out for two or three
mild laps at 5500 RPM to stabalize the engine core temperature. Pull in the
pits, get out and hot torque (without backing off) the head nuts in sequence
from the center, alternating fore and aft.. Go back out and finishe the
session at 5500rpm. 2nd Session. After warming up in the paddock, take it
out at 6000 RPM and gradually increase until you are doing 6500 by the end
of a 20-30 minute session. 3rd Session. After warming up in the paddock,
take it out at 6500 RPM and work it up to 7500 RPM by the end of the
session. 4th Session. After warmup, take it to 7000-7500 as necessary
through the gears and let it eat all it wants in 5th gear. BREAK IN OIL. The crankcase is filled with a 40 weight non detergent ( no additives) Valvoline engine oil. This is necessary to let the new piston rings and freshly honed cylinder walls have enough friction to wear off the high spots and let the rings take a seat. After two or three sessions (a full day) change to the Mobile 1 10w-30. You will note a little beard of fine ferrous debris clinging to the magnet on the plug. This is normal and means that the rings have happily seated. Do not worry about the residual oil in the filter or lines. You can drain or change the filter if you like. OIL CHANGE INTERVAL. One could probably just top off the oil for an entire season. The modern concoctions of polymers enhanced performance oils are probably that good. I feel better changing every two or three races, just to see if there is anything on the magnet or "sparkling" when swirrelled around in the drain pan. SPARK PLUGS. Here again, one can leave them in most of the year. On the first weekend, I would cut it clean and coast into the pits one time just to make sure the white porcelain centers have some color (light tan) and are not bright white or too dark. The edges of the electrodes begin to erode and sat some point after a few races you may want to change them. Some people put in new plugs before every race and leave them in until just before the next race. I prefer to run new plugs one session before committing to a race untested, I have had bad plugs right out of the box. IGNITION TIMING. No need to check or change. It is set ant 34-35 degrees of total advance and it should be happy there for eternity. The timing can not change since the distributor is fitted with a paddle wheel and Ford reluctor that makes no contact and does not wear out. TIRE PRESSURES: Cold pressure setting should start at 35#. The hot buildup should range 40-41#. This should be checked during a practice session when you can pull into the pits, hop out and start checking pressure at the LF tire and work anti-clockwise around the car. This is to make sure you check the most important corner of the car first before it has a chance to cool off. These radial tires are designed to have the correct sidewall deformation and maximum footprint on the ground at a hot running pressure of 40-41# of pressure. Starting at 35# you will be close, and should add or subtract pressure to achieve the correct range. Do not worry if you can not nail it just right........a pound or two low will not make much difference. Sometimes, I have a hard time getting enough pressure buildup, especially on the RR. Once you establish the correct hot pressure, wait for them to cool off completely and check the pressure with all four tires in the shade.. This will establish the cold starting pressure you need to have first thing in the morning before the sun gets up and starts to raise the tire temps. If you venture out of Florida to cooler climate, the AM starting cold pressure will drop commensurably and you will need to establish a different morning baseline. TIRE CARE AND ALIGNMENT. The alignment is set 2.4 neg camber; 2.8 pos caster; 1/16 toe out. I established this from the Hoosier tire distributor, three Alfa racers and my chassis builder. Unless you bang a curb or something drastic, this setting should last all year. Rotate tires from front to rear (do not cross radials) to keep the directional rotation the same. The camber in the front end will wear the inside of the tire more than the outside and you can balance this out by letting them run on the rear. Consult your Hoosier vendor at the track when you feel you are losing grip. Strike up a rapport with these guys and they will help you get the most out of your rubber. They will not try to sell you tires you do not need. HANDLING. With new suspension pieces in the front end, the car will be very different from the last driving experience. With the old worn out pieces you described uncertainty as to how it would behave on braking and turning. . If you push it before the Hoosier radials expand to 40# the car will break loose unpredictably in the corner. You should now experience uniform predictability, waiting a couple of laps for the tires to warm up. Initially the car will either push (understeer), break loose in the rear (oversteer) or be neutral. The only remedy you should pursue is to adjust the rear sway bar. If it pushes it needs to be tightened up a bit (shorten the lever arms). Conversely, lighten up on the rear bar if the oversteer is too severe. What is too much? Just a touch of looseness in the rear end is where you want to be. You want the rear to begin to slip when you turn in, feel the grip and get into the throttle a bit. The perfect world is where you are using throttle oversteer (in conjunction with the steering wheel of course) to correct and steer through the corners. I would guess you will experience oversteer since the front end will be
turning in nicely and swinging the rear out more than before. |
|
Weber Jetting Chart |
JE FORGED PISTONS We can design and special order any piston you need! We sell single pistons and pins if you damage one and need a spare. We stock spare ring sets, but unfortunately can not break sets to sell singles. GENERAL NOTES. I have proven on the dyno that our designs on the JE billets make more power. We have been working with the people at JE on our pistons since 1978 and have yet to see a documented piston related failure. My friends in the NASCAR engine business turned me on to them and I have never strayed. Through our racing engine research and on track experience we have continuously modified the designs for better performance and ease of installation. We welcome customer input and have made a number of changes by popular request. We won three SCCA E-PRODUCTION National Championships using the same 81mm pistons you can now buy off our shelf. Our customers all over the world are winning races with our pistons. All of the professional Alfa engine builders use our JE design pistons. If you are not a pro, then you will enjoy following our three page set of instructions that come with each set. If you encounter problems or have questions, I am happy to help you over the phone or by email at any time: paul@paulspruell.com. We can design and special order any piston you need Customer Testimonial...D. G. wrote: Paul,
I want to install the spare
race engine in my street GT Junior. This is a mild 2L and I read somewhere
that you can supply a flywheel to adapt it to the mechanical transmission...<snip>....On
another note we added your JE pistons to the race car this past season and
gained quite a bit. We knocked 2 seconds off our best time at Watkins. I
am impressed. [emphasis
added]
|
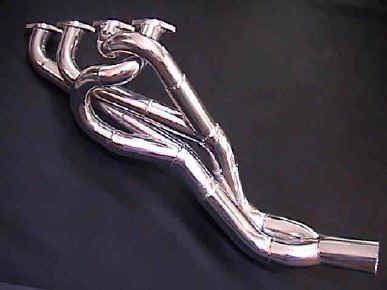
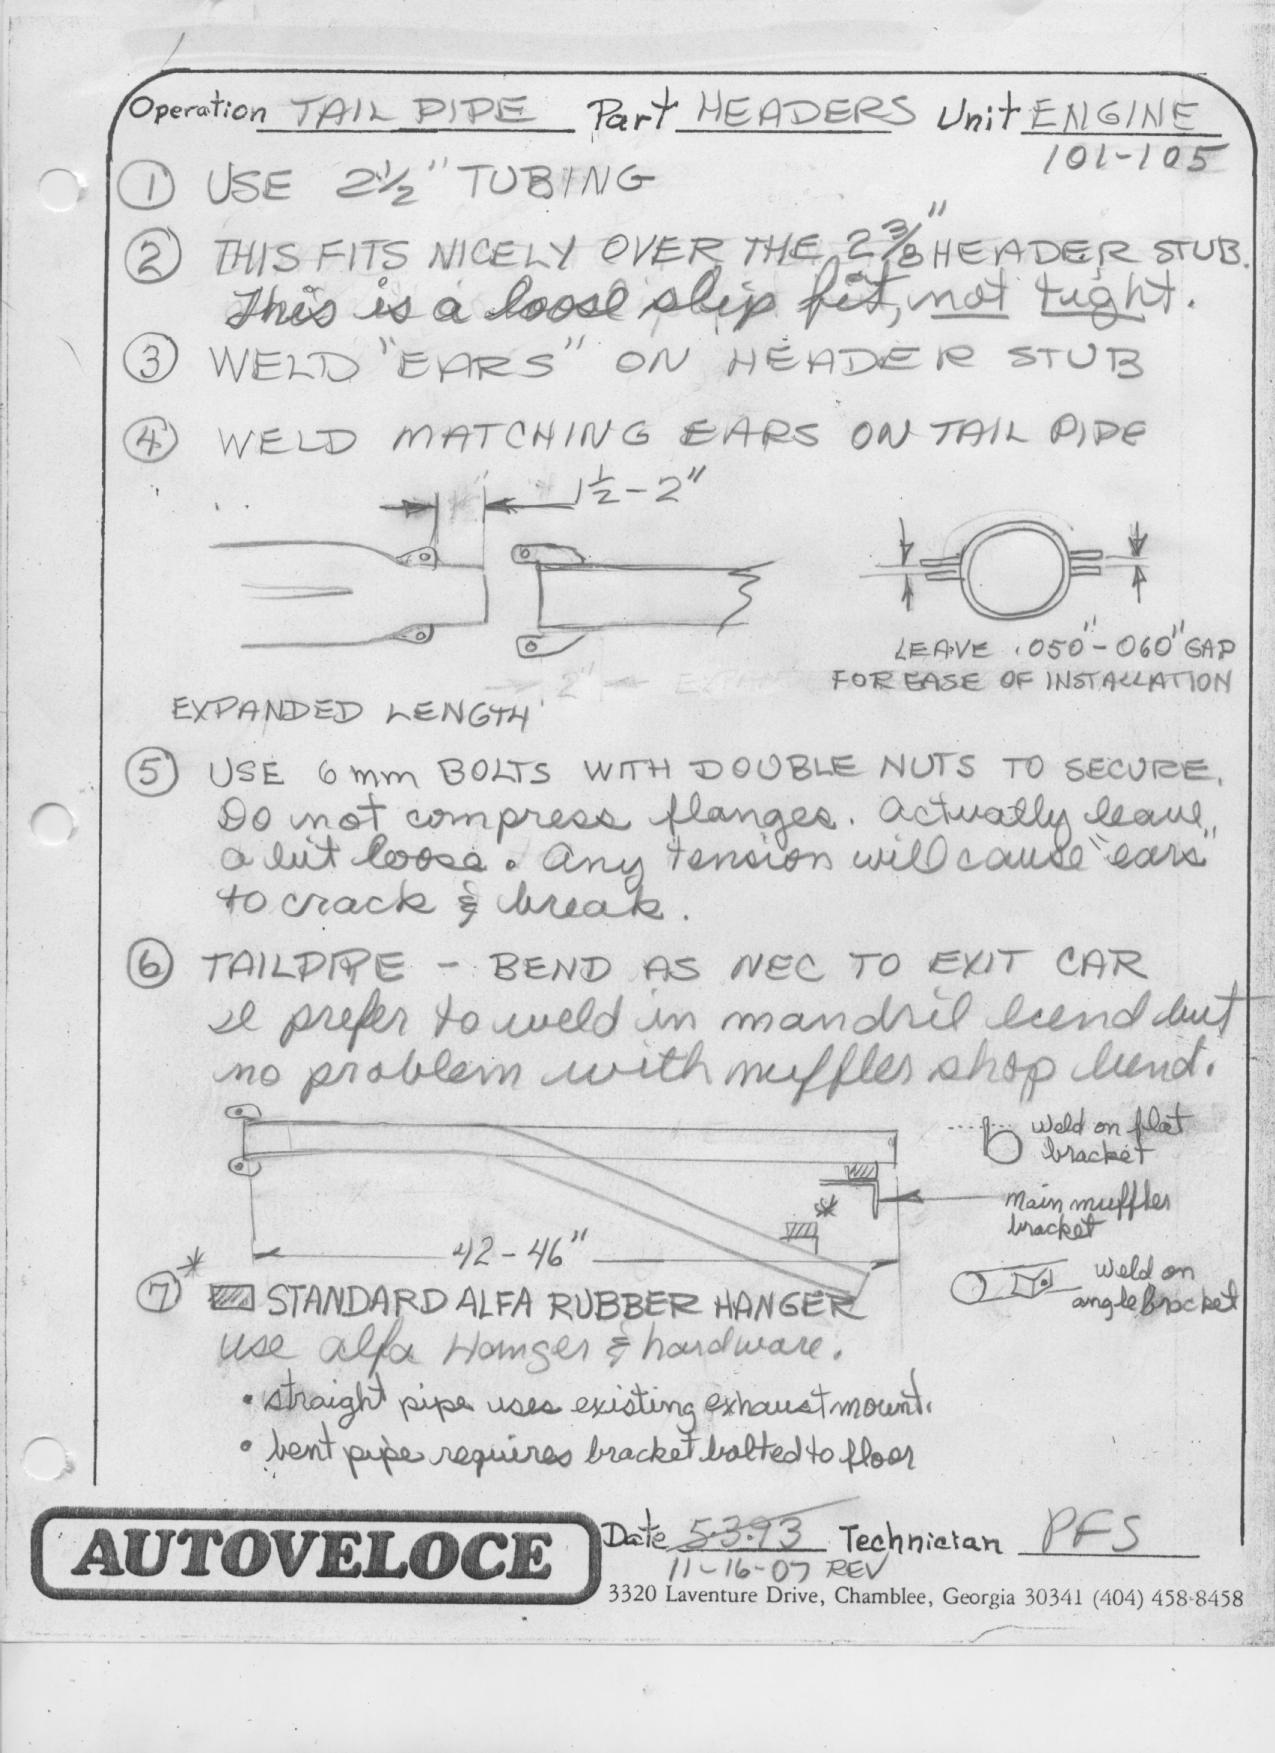
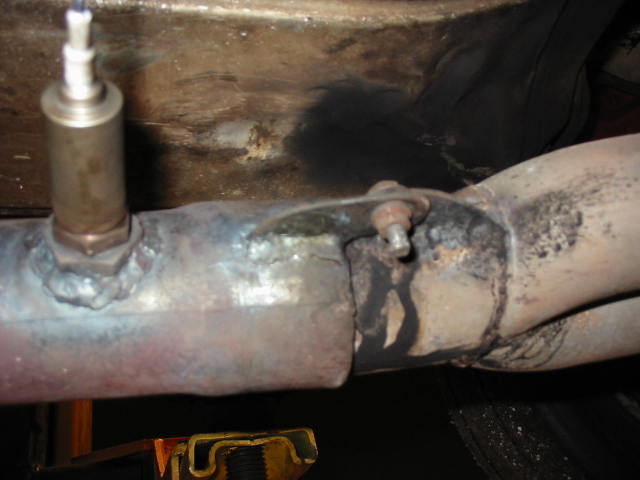
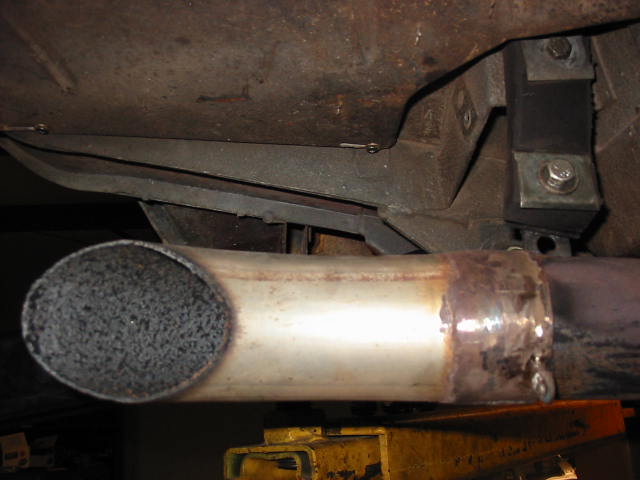
RACE HEADERS ***Black ceramic finished headers require heating to 750ş Fahrenheit to be fully cured. Therefore, after installation, please allow your vehicle to idle for ˝-1 hour to complete the curing process.*** Special instructions for exhaust/tailpipe connections.. For racing applications, one should install a 2 1/2" tail pipe somewhere between 42 and 46" in length for all displacements from 1300 to 2000. It takes dyno tuning to determine the absolute best length for each engine configuration. A good rule of thumb is that the shorter pipe yields more torque and the longer more top end. My advice is to run it straight back and hang it from the standard mounting bracket on the chassis. It is a good idea to have a 45 degree bend at the end to shoot the discharge at the pavement to mitigate the sound. We furnish a set of tabs that the customer can weld on to make this connection. We also furnish a sketch of how we mount the tailpipe on our race cars with photos from my ITB Spider (see below). Sorry, but we do not offer tail pipes for sale since they are dirt cheap and simple enough for a customer to do. For street applications. Both the early and late model headers terminate forward of the standard system resonator with a single 2 3/8" collector tip pipe. To mate the headers to a stock exhaust system, a short section of pipe is required reducing the size from 2 3/8" header tip to 2" to make the union with the stock system. Any good muffler shop can accomplish this. Street systems should not use the tabs for attachment. The adapter pipe has to be welded to seal up the back pressure. Sorry, we do not sell custom exhaust systems.
|
Please Call Us at (770) 457-ALFA(2532) or (800)
552-ALFA for a
full inventory of available Alfa Romeo racing parts.
Thanks!
|